


Lately I visited my first Chaos Computer Congress (34C3) which was a really great event. I learned a lot about security and data privacy there. The result was that after the first day I found myself banning Amazon Echo from my living room. During the following days my suspicion towards smart home devices grew more and more. So I decided that it was time to find out which of my devices enjoy talking home and are sending data about me to the cloud. As all my smart home devices are connected via wifi I decided to monitor the wireless traffic of suspicious devices. A Raspberry Pi 3 which I had in spare should provide a wireless access point and bridge it to the ethernet port that goes straight to the router. This way the device under surveillance can talk home unaffected. But I can now monitor the traffic with a network monitoring tool like Wireshark.
Preparations
Set up a Raspberry Pi with Raspbian
The Ethernet port of the Raspi will be connected to the router while the wireless port will be used as an access point for the devices that shall be monitored. I used a Raspberry Pi 3 which already has built-in wifi. If you use a Raspi without built-in wifi you will need to get a wireless dongle in order for this setup to work.
At first we need to install the operating system. Download the newest Raspbian image with Pixel Desktop from raspbian.org. Please do not use the light version of Rapbian. Wireshark is a tool that uses a graphical user interface that's why we need a graphical Desktop environment which is not included in the light version. Of course you can always add a graphical desktop to your installation afterwards. But this is unnecessary work here and will not be covered by this tutorial.
After downloading the image from the official website you need to flash the image to a micro-sd card. I recommend using Etcher here. It provides the most simple user interface and also validates your image afterwards. But of course you can also use good old dd if you are on Linux/Mac.
$ dd bs=4M if=raspbian.img of=/dev/sdX status=progress conv=fsync
When using dd make sure to unmount the sd-card first and change the relevant arguments for if and of. I will not describe the use of dd here but on raspberry.org you can find a comprehensive description on using dd.
Enable SSH and VNC
SSH
We want to access our Raspberry remotely from our main computer so we will need to enable SSH for remote console access and VNC for remote GUI access. The easiest way to activate SSH is the headless setup. Here is the description for a headless setup from the official documentation on using SSH.
For headless setup, SSH can be enabled by placing a file named ssh, without any extension, onto the boot partition of the SD card from another computer. When the Pi boots, it looks for the ssh file. If it is found, SSH is enabled and the file is deleted. The content of the file does not matter; it could contain text, or nothing at all.
If you have loaded Raspbian onto a blank SD card, you will have two partitions. The first one, which is the smaller one, is the boot partition. Place the file into this one.
Now you can place the sd-card in your Pi and bring it up. To remotely login use the following command:
$ ssh pi@192.168.x.x
The default password for ssh access is raspberry. If you are on Windows please use the tool Putty which is a free SSH and telnet client for Windows.
VNC
Now we also want to enable remote access to our graphical desktop. We can do this by enabling the VNC server which is already installed on our Raspi. Bring up the confiruation tool with
$ sudo raspi-config
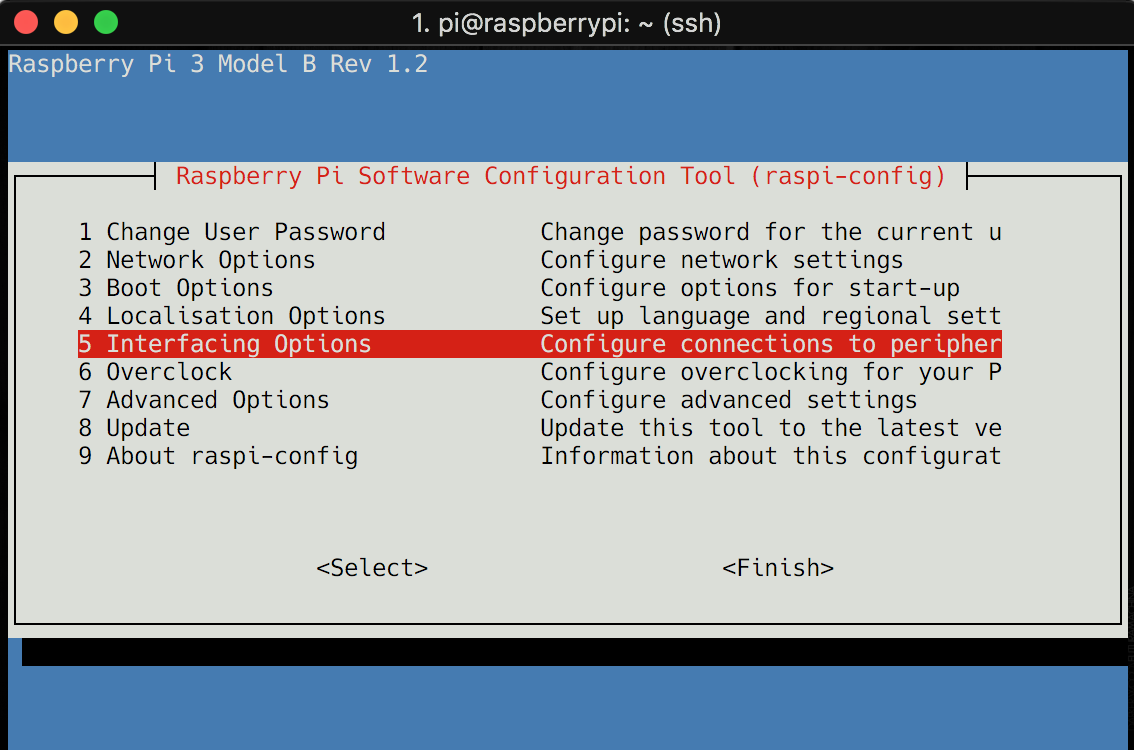
Now go in Interfacing Options and enable VNC. For further information have a look at the documentation on remote access Now bring up your RealVNC client and login to your Raspi. You should see the PIXEL Desktop now.

Set up the wifi access point
1. Install hostapd and bridgeutils
Now we need two tools to make our setup work. At first we need to provide a wireless access point from our Raspi. This is done by the tool hostapd. The second tool bridge-utils allows us to configure a network bridge between our access point and the router which is connected to our ethernet port.
$ sudo apt-get install hostapd bridge-utils
After both tools are installed we need to stop the hostap daemon because it is not yet configured.
$ sudo systemctl stop hostapd
2. Configure the wifi host (hostapd)
The configuration of hostap is done in a configuration file. Open the config file with the following command:
$ sudo vi /etc/dhcpcd.conf
The file should not be there yet and the content should be empty. Add the following lines.
/etc/dhcpcd.conf
# bridge mode
bridge=br0

# interface and driver
interface=wlan0
#driver=nl80211  # network driver, do not uncomment unless needed

# wifi fonfig
ssid=PiBridge  # change to your preferred ssdi
channel=1
hw_mode=g
ieee80211n=1
ieee80211d=1
country_code=DE  # change to your country code
wmm_enabled=1

# WLAN-Verschlüsselung
auth_algs=1
wpa=2
wpa_key_mgmt=WPA-PSK
rsn_pairwise=CCMP
wpa_passphrase=foobar  # change to your password
Normally the parameter driver can stay commented as hostapd loads the right driver automatically. However, if auto-loading won't work you might need to explicitly supply the right driver.
Save and close the file. We also need to change the access rights so that only root can read the file.
$ sudo chmod 600 /etc/hostapd/hostapd.conf
3. Configure the network bridge
$ sudo vi /etc/network/interfaces
Insert the following lines:
/etc/network/interfaces
# localhost
auto lo
iface lo inet loopback

# ethernet
auto eth0
allow-hotplug eth0
iface eth0 inet manual

# wifi
auto wlan0
allow-hotplug wlan0
iface wlan0 inet manual
wireless-power off

# bridge
auto br0
iface br0 inet dhcp
bridge_ports eth0 wlan0  # build bridge
bridge_fd 0  # no forwarding delay
bridge_stp off  # disable Spanning Tree Protocol
Close and save the file. Now we need to reboot the Pi.
$ sudo reboot
After the restart you should be able to see the new bridge by calling:
$ sudo brctl show
Don't worry if you can't see the interface wlan0 here. You will only see it if the interface has been started with hostapd.
Test your access point
At first we will check if the access point is working properly. We will use the debugmode of hostapd here.
$ sudo hostapd -dd /etc/hostapd/hostapd.conf
If you get any error messages you might need to adjust your /etc/hostapd/hostapd.conf. One error I had was a WPA-password that was too short. Make sure to use at least 8 characters. If you start up hostapd without debugmode there should be a message "wlan0: AP-ENABLED" if everything is OK.
$ sudo hostapd /etc/hostapd/hostapd.conf
Now we need to tell hostapd daemon to automatically use our config file on startup. We do this by editing the following config file.
$ sudo vi /etc/default/hostapd
We add the following parameters here:
RUN_DAEMON=yes
DAEMON_CONF="/etc/hostapd/hostapd.conf"
Close and save the file.
After a restart hostapd will start with the right config file and the newly created Wifi bridge should be available. I used the great tutorial "Raspberry Pi als WLAN-Bridge einrichten (WLAN-Access-Point)" from Elektronik Kompendium to get this right. It contains some more informations on trouble shooting if your setup is not working.
So now we have set up our wireless proxy. There should be a wireless network called PiBridge. Connect the device you want to monitor to this one and use the password that you chose in your setup. The device should connect. Check if internet access is working. If not then you need to check the setup of your bridge again.
Wireshark
The last piece that is missing now is our network monitor. Wireshark is the tool of my choice here and it is very powerful. It allows to monitor any interface on your device and apply comprehensive filters for capturing and displaying. Installation of Wireshark is easy:
$ sudo apt install wireshark
Bring up Wireshark from via VNC or directly from your Raspberry Pi Desktop. Make sure to start it with root rights by opening the console and type:
$ sudo wireshark
Now you can connect any device which you would like to monitor to the newly created access point and use Wireshark to capture its packets. Make sure to set up the filters correctly. The usage of Wireshark is not handled in this tutorial but here are some links that might help you if you are not used to Wireshark, yet.
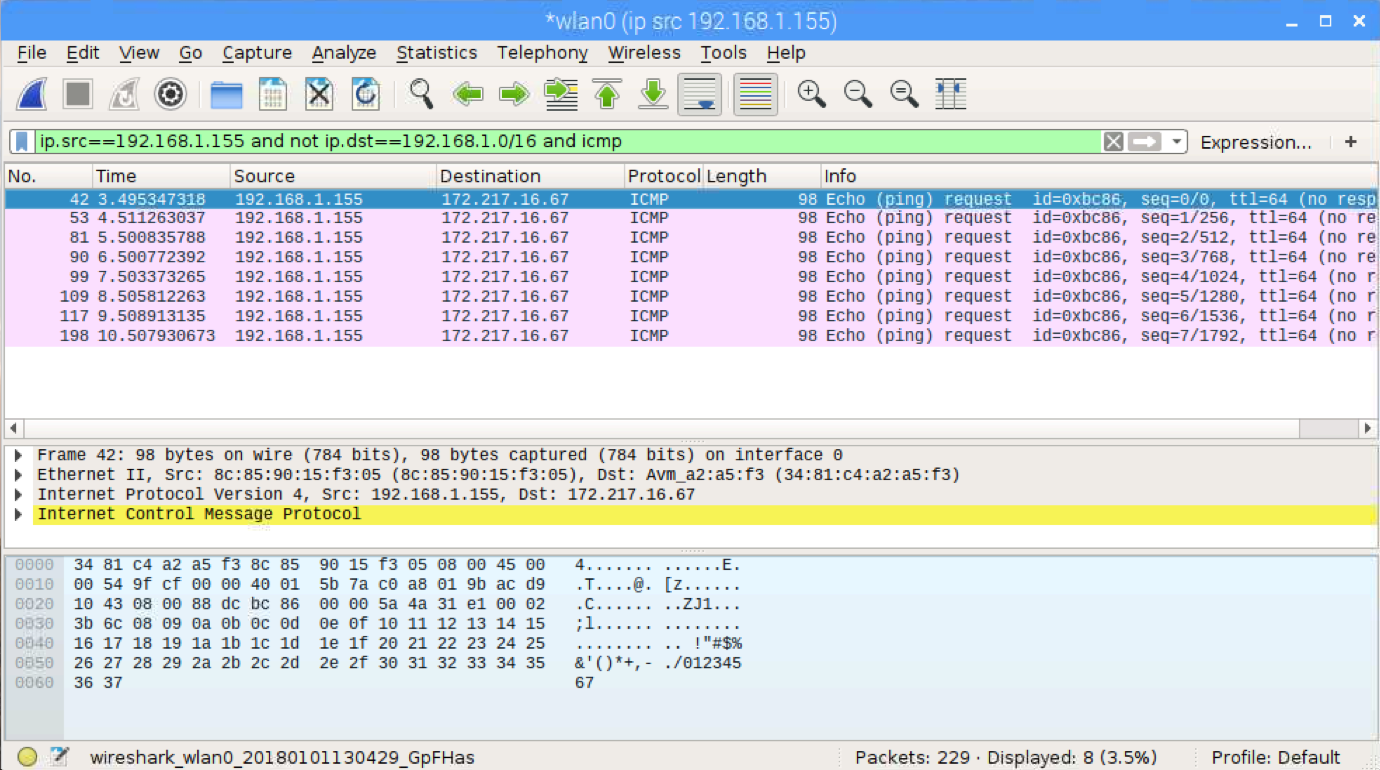
For a quick test we want to see if we can capture icmp packages (that are used for ping). You may connect your computer to the PiBridge wifi, bring up the console and do:
$ ping google.com
Now you connect to the Raspi with RealVNC and start Wireshark. Select the interface wlan0 and start capturing. There will be a lot of packages here. We only want to list the packages that are sent from our device under survaillance (computer) and also we only want to see packages leaving our network to the internet. Finally we want to list only icmp packages. We can do this by applying a display filter:
ip.src==192.168.1.155 and not ip.dst==192.168.1.0/16 and icmp
The first part limits the source ip address to 192.168.1.155 which is my computer ip. The second part limits the destination ip address to adresses other tha 192.168.1.0..255. Finally we add the protocol we want to capture which is icmp. Now we see only our ping requests:
That's it. Happy sniffing. I hope you enjoyed this little tutorial. Please feel free to leave comments. I'm aware there might me some errors or I might have missed some important points so feedback is very welcome.